Installing \(\texttt{Gkeyll}\)
\(\texttt{Gkeyll}\) features a variety of machine files and installation scripts, which are intended to facilitate the process of building and installing all of the requisite dependencies, as well as the code itself, on various different operating systems and supercomputer clusters. The entire process is designed to be as automated as possible. Below, we shall describe the typical process of building \(\texttt{Gkeyll}\) on a personal computer (for both macOS and Linux), as well as on a supercomputer cluster.
This page is somewhat lengthy, but fear not: the process itself
is quick and straightforward! The length is testament to the fact that
\(\texttt{Gkeyll}\) is highly customizable, with many possible configurations and
options for building on a single CPU (without MPI), on multiple CPUs (with MPI), on a
single GPU (with CUDA), on multiple GPUs (with CUDA and NCCL), etc. We also detail
various ways to test whether a particular installation of \(\texttt{Gkeyll}\) is
configured and working correctly, as well as how to install the
\(\texttt{postgkyl}\) visualization and post-processing pipeline in Python. The
instructions below assume that you have a working C compiler (such as gcc or
clang when building for CPUs on macOS or Linux, or nvcc when building for NVIDIA
GPUs) installed on your machine.
The first step in any \(\texttt{Gkeyll}\) installation is to clone the repository from GitHub (which can be found here):
git clone https://github.com/ammarhakim/gkeyll.git
and then, once it has been cloned, to navigate into the gkeyll directory:
cd gkeyll
Depending upon whether you are building \(\texttt{Gkeyll}\) on macOS, Linux, or a supercomputer cluster, begin by reading either the macOS Setup Instructions, the Linux Setup Instructions, or the Supercomputer Cluster Setup Instructions. Then, read the guide to Building and Testing Gkeyll (assuming that you are building \(\texttt{Gkeyll}\) on a single CPU). If you are building \(\texttt{Gkeyll}\) on a GPU, or if you intend to take advantage of multi-CPU and/or multi-GPU parallelism, then read the guide to Parallel and GPU Builds, in order to understand how the building and testing process differs in these cases. Finally, read the guide to Installing postgkyl, in order to be able to use the \(\texttt{postgkyl}\) visualization and post-processing pipeline. By the end of this guide, you should have been able to build, run, and visualize the output of, your first \(\texttt{Gkeyll}\) simulation.
macOS Setup Instructions
Building \(\texttt{Gkeyll}\) on macOS is in many respects easier than on many other
platforms, since the existence of the macOS Developer Tools eliminates the need to
build and install OpenBLAS, so the only dependencies that must be built and installed
are SuperLU and LuaJIT. Installing SuperLU requires cmake, which can be
installed straightforwardly using brew:
brew install cmake
Then, to download, build and install the SuperLU and LuaJIT dependencies on
macOS, simply run:
./machines/mkdeps.macos.sh
To generate the default \(\texttt{Gkeyll}\) configuration on macOS (i.e. using Lua, but not using CUDA, MPI, NCCL, ADAS, etc.), now run:
./machines/configure.macos.sh
which will generate the default config.mak configuration file for macOS.
Linux Setup Instructions
The build process for \(\texttt{Gkeyll}\) on Linux is very similar to the process
on macOS, except that OpenBLAS needs to be built and installed (in addition to
SuperLU and LuaJIT). Once again, the SuperLU installation requires
cmake, which can be installed using the apt package manager on distributions
such as Debian and Ubuntu:
sudo apt update
sudo apt install cmake
or the dnf package manager on distributions such as Fedora and CentOS:
sudo dnf install cmake
Then, to download, build and install the OpenBLAS, SuperLU, LuaJIT and
OpenMPI dependencies in Linux, simply run:
./machines/mkdeps.linux.sh
To generate the default \(\texttt{Gkeyll}\) configuration on Linux for CPUs only
(i.e. using Lua, but not using CUDA, MPI, NCCL, ADAS, etc.), now run:
./machines/configure.linux-cpu.sh
which will generate the default config.mak configuration file for Linux on CPUs.
Supercomputer Cluster Setup Instructions
\(\texttt{Gkeyll}\) already has pre-assembled machine files for a number of
different Princeton University supercomputer clusters (such as Stellar, Della,
and Traverse, including both CPU and GPU nodes on each), as well as for various
national supercomputers (such as Perlmutter). The process of building
\(\texttt{Gkeyll}\) on one of these clusters is then very similar to the process on
any other Linux machine, except that the process of loading the requisite modules must
be performed manually. For example, suppose that we are building \(\texttt{Gkeyll}\)
for a CPU node on Stellar (i.e. stellar-intel). To ensure that the correct
versions of OpenBLAS, SuperLU and LuaJIT have been installed in the
gkylsoft directory of stellar-intel, simply run:
./machines/mkdeps.stellar-intel.sh
To generate the default \(\texttt{Gkeyll}\) configuration on a Stellar CPU node
(i.e. using Lua, ADAS, and OpenMPI, but not using CUDA, NCCL, etc.), now run:
./machines/configure.stellar-intel.sh
which will generate the default config.mak configuration file for a Stellar CPU
node. Finally, the only remaining step before proceeding to the build/install phase is
to load the required modules, which can be checked by inspecting the configuration
script for stellar-intel:
cat machines/configure.stellar-intel.sh
Note the two module load lines at the top for intel/2021.1.2 and
openmpi/intel-2021.1/4.1.2, so all that remains to be done before proceeding to build
the code is to run:
module load intel/2021.1.2
module load openmpi/intel-2021.1/4.1.2
On the other hand, suppose that we are building \(\texttt{Gkeyll}\) instead for a
GPU node on Stellar (i.e. stellar-amd). The mkdeps and configure steps
are directly analogous as for the CPU case:
./machines/mkdeps.stellar-amd.sh
./machines/configure.stellar-amd.sh
with the mkdeps step now additionally building the cuDSS dependency. However,
now the top of the configuration script for stellar-amd:
cat machines/configure.stellar-amd.sh
indicates that a different set of modules must be loaded in instead, namely
cudatoolkit/12.4 and openmpi/cuda-11.1/gcc/4.1.1, so we must run:
module load cudatoolkit/12.4
module load openmpi/cuda-11.1/gcc/4.1.1
before proceeding to build the code.
Building and Testing \(\texttt{Gkeyll}\)
Once the operating system-specific (or machine-specific) setup has been completed, as
described above, all that remains is to build \(\texttt{Gkeyll}\) itself. To build
the entire \(\texttt{Gkeyll}\) code (with the -j argument to enable maximal
parallel threading, if available), just run:
make install -j
On the other hand, to build a specific app only (e.g. just \(\texttt{moments}\)), run:
make moments-install -j
(where moments in the above can be replaced with core, vlasov,
gyrokinetic or pkpm, as appropriate) instead. If the make command runs
without errors, then congratulations: you’re done! To confirm that the entire
\(\texttt{Gkeyll}\) system has been built correctly, try building the complete
suite of C regression tests:
make regression -j
and then running a simple pkpm C regression test (since the pkpm app exists at
the highest level of the \(\texttt{Gkeyll}\) hierarchy, so this is a quick way to
confirm that the entire hierarchy has been built correctly):
./build/pkpm/creg/rt_pkpm_wall_p1
Likewise, to confirm that the \(\texttt{Gkeyll}\) executable itself has been built correctly (which includes the in-built Lua interpreter, thus allowing \(\texttt{Gkeyll}\) to run Lua input files), first run:
make gkeyll -j
and then run the corresponding pkpm regression test from Lua using:
./build/gkeyll/gkeyll ./pkpm/luareg/rt_pkpm_wall_p1.lua
On the other hand, to confirm that only a specific app has been built correctly (e.g. \(\texttt{moments}\), continuing the example from above), try building the suite of C regression tests for that app only:
make moments-regression -j
and then running a simple moments C regression test:
./build/moments/creg/rt_5m_gem
and likewise for any of core, vlasov, gyrokinetic and pkpm. As a final
check to confirm that all components of the \(\texttt{Gkeyll}\) system been built
correctly, try building and running the complete suite of unit tests:
make check -j
and confirming that they all pass. Likewise, the suite of unit tests for only a specific app (such as \(\texttt{moments}\)) can be built and run using:
make moments-check -j
and likewise for any of core, vlasov, gyrokinetic and pkpm.
Parallel and GPU Builds
In order to run \(\texttt{Gkeyll}\) in parallel (i.e. on multiple CPUs), it is first
necessary to ensure that the code is configured to build with MPI. In many machine files
(e.g. for stellar-intel), this is done automatically, since the configure
command is run with the flag --use-mpi=yes, along with appropriate paths to the MPI
/include and /lib directories. You can check whether \(\texttt{Gkeyll}\) is
configured to build with MPI or not by checking line 17 of the config.mak file, which
will read:
...
USE_MPI=1
...
if \(\texttt{Gkeyll}\) is configured to use MPI, and:
...
USE_MPI=
...
otherwise. You can manually set USE_MPI=1 if you wish to build with MPI, in which
case, please ensure that CONF_MPI_INC_DIR and CONF_MPI_LIB_DIR on lines 18 and 19
of config.mak are correctly set to the appropriate locations of your MPI /include
and /lib directories, which should look something like (assuming that you are using
OpenMPI):
...
USE_MPI=1
CONF_MPI_INC_DIR=/Users/<your username>/gkylsoft/openmpi/include/
CONF_MPI_LIB_DIR=/Users/<your username>/gkylsoft/openmpi/lib/
...
If you do not have a working MPI installation on your machine, you can ask
\(\texttt{Gkeyll}\) to install one automatically to your /gkylsoft directory by
adding the --build-openmpi=yes flag to the ./mkdeps.sh call within the particular
mkdeps file for your machine/operating system in the /machines directory,
and then (re)running mkdeps as described in
macOS Setup Instructions,
Linux Setup Instructions, or
Supercomputer Cluster Setup Instructions, as appropriate.
Finally, to build \(\texttt{Gkeyll}\) with MPI enabled, all that remains is to
produce a clean build of the \(\texttt{Gkeyll}\) executable
make clean
make gkeyll -j
with make clean only required if you have previously built a serial version of the
code (i.e. a version without MPI). To confirm that the parallel build was successful,
try running:
./build/gkeyll/gkeyll -help
and near the top of the resulting output should be a banner which looks something like:
...
Gkeyll built with Git changeset <changeset>
Gkeyll built on <timestamp>
Built without CUDA
Built without NCCL
Built with MPI
...
If the banner instead reads Built without MPI, then something has gone wrong with
either the configuration or the build itself. To confirm that \(\texttt{Gkeyll}\)
simulations can now be run correctly in parallel, first try running a simple
\(\texttt{moments}\) simulation in serial:
./build/gkeyll/gkeyll ./moments/luareg/rt_5m_gem.lua
and take note of the total amount of time that the simulation took to run:
...
Total updates took <time> secs
...
To run the same simulation in parallel using MPI, we must first configure the simulation
to decompose its domain into a number of subdomains that is equal to the total number of
available MPI ranks. Open the moments/lua/rt_5m_gem.lua input file and edit line 63,
which specifies the decompCuts parameter:
...
-- Decomposition for configuration space.
decompCuts = { 1, 1 }, -- Cuts in each coordinate direction (x- and y-directions).
...
and try partitioning the domain into a total of 4 subdomains: 2 in the x-direction and 2 in the y-direction:
...
-- Decomposition for configuration space.
decompCuts = { 2, 2 }, -- Cuts in each coordinate direction (x- and y-directions).
...
And now try running the simulation again, this time using 4 MPI processes:
mpirun -np 4 ./build/gkeyll/gkeyll ./moments/luareg/rt_5m_gem.lua
and, upon checking the total simulation time again, you should find that it took approximately one quarter of the time (perhaps slightly more, due to Amdahl’s law) of the serial run.
Installing \(\texttt{postgkyl}\)
\(\texttt{postgkyl}\) is \(\texttt{Gkeyll}\)’s custom-built Python post-processing and visualization pipeline, capable of performing many advanced analysis and plotting tasks on \(\texttt{Gkeyll}\) simulation output. For further information on how to use these capabilities, please refer to this tutorial presentation by Petr Cagas. To build \(\texttt{postgkyl}\) from source, one must first clone the repository from GitHub (which can be found here):
git clone https://github.com/ammarhakim/postgkyl.git
and then, once it has been cloned, navigate into the postgkyl directory:
cd postgkyl
At this point, we recommend using venv to create a Python virtual environment
specifically for \(\texttt{postgkyl}\), for instance by running:
python -m venv /pgkyl
where /pgkyl in the above can be replaced with any file path, corresponding to where
the \(\texttt{postgkyl}\) virtual environment should be stored. How this environment
should be activated depends upon which shell you are using (which you can determine by
running echo $0 or echo $SHELL). For bash or zsh, you should run:
source pgkyl/bin/activate
while for fish, you should run:
source pgkyl/bin/activate.fish
and finally for csh or tcsh, you should run:
source pgkyl/bin/activate.csh
where, in each of the above, pgkyl can be replaced by whichever alternative file
path the virtual environment was stored within, as applicable. Once the virtual
environment has been activated, \(\texttt{postgkyl}\) itself can be installed
using pip:
pip install -e .
which will also automatically install each of \(\texttt{postgkyl}\)’s dependencies,
i.e. click, matplotlib, msgpack, numpy, scipy, sympy, and
tables, as needed. Once the pip installation has been completed, to confirm that
\(\texttt{postgkyl}\) has been built correctly, try compiling and running a simple
\(\texttt{moments}\) C regression test in \(\texttt{Gkeyll}\):
make moments-regression -j
./build/moments/creg/rt_5m_gem
and then plotting the resulting simulation data with \(\texttt{postgkyl}\):
pgkyl rt_5m_gem-elc_1.gkyl sel -c3 plot -a
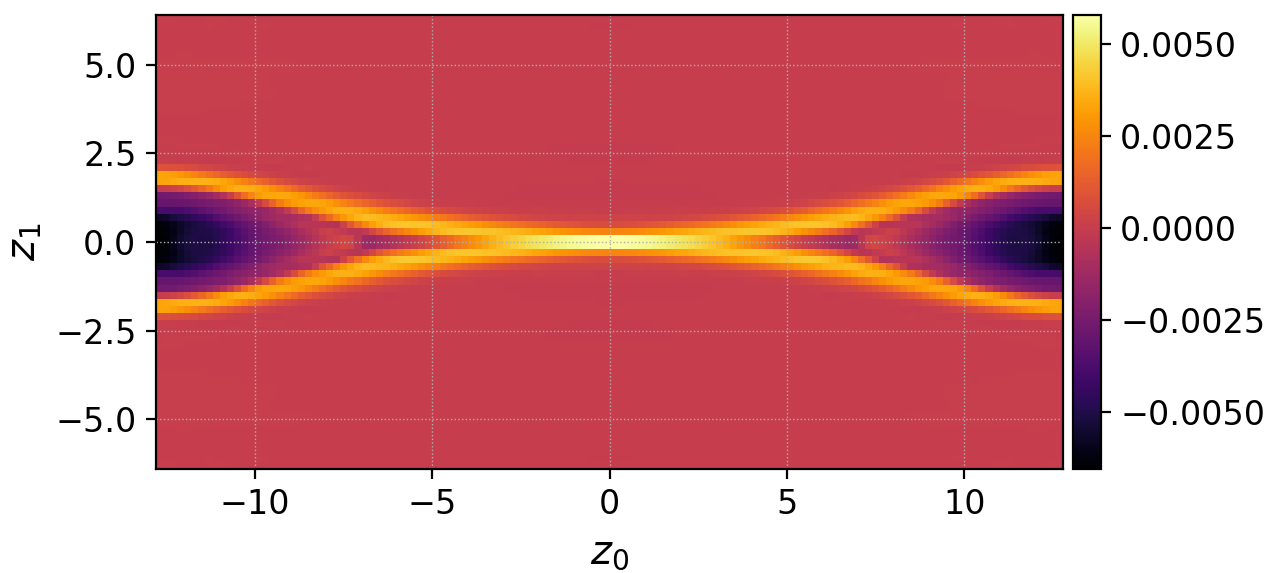
The \(z\)-component (i.e. the out-of-plane component) of the electron momentum density \(\rho_e \mathbf{u}_e\) (i.e. component 3 of the conserved variable vector) for the GEM (Geospace Environment Modeling) magnetic reconnection problem, as solved using the 5-moment multi-fluid model.